Top 4 Ways to Open Screen Saver Settings in Windows 10
Enabling screen saver can protect your computer from prying eyes when your computer is not in use, it will automatically lock the computer screen and apply password protection. To open screen saver, you have to open the Screen Saver Settings dialog. In window 10, this feature was hidden in an unobvious place so that it’s not easy to find it, so in this post we’ll show you 4 ways to find and set screen savers on Windows 10.
Part 1: How to Open Screen Saver Settings in Windows 10
Here are four ways to enable screen saver in Windows 10, just follow the steps below:
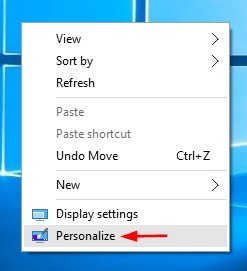
Method 1: Open Screen Saver Settings by Right-clicking the Desktop
Step 1: Right-click on any empty space of your desktop, and select Personalize from the context menu.

Step 2: When the Settings app launches, select Lock screen on the left side. Click the Screen saver settings link on the right side at the bottom.

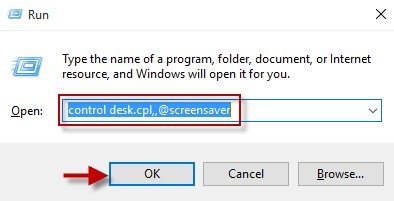
Method 2: Open Screen Saver Settings from Run or Command Prompt
You can also open screen saver setting from command prompt in Windows 10, here’s how:
Bring up the Run box by pressing the Windows key + R. Type the command control desk.cpl,,@screensaver and hit Enter.

Or run the above command at the Command Prompt, it will also open Screen Saver Settings dialog in Windows 10.

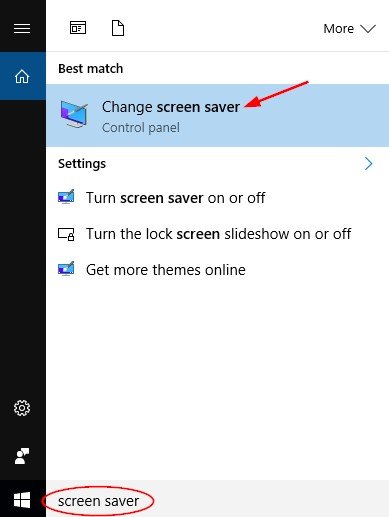
Method 3: Open Screen Saver Settings from Windows 10 Search Box
Step 1: Click the Cortana Search box at the taskbar and type in Screen Saver.
Step 2: Click on “Change screen saver” and it will take you to the Screen Saver Settings right away where you can turn on or off screen saver in Windows 10.

Method 4: Open Screen Saver Settings from Control Panel
Open the Control Panel in Windows 10. You’ll see a Search box in the upper right corner. Type Screen Saver and press Enter.
Click on “Change screen saver” from the search result. This will open the Screen Saver Settings dialog immediately.

Part 2: How to Turn Off Screen Saver settings in Windows 10
But sometimes screen saver will bother you when installing some important software or updating Windows operating system. And after activating screen saver, you need to re-login and type password again. For those who don’t want screen saver to be activated automatically, Please follow this step to turn off screen saver settings in Windows 10.
Step 1: Click the Windows icon in the corner at the bottom left side > Click on Settings > Select Personalization

Step 2: Select Lock Screen option > Go to Screen Saver Settings in the right pane.

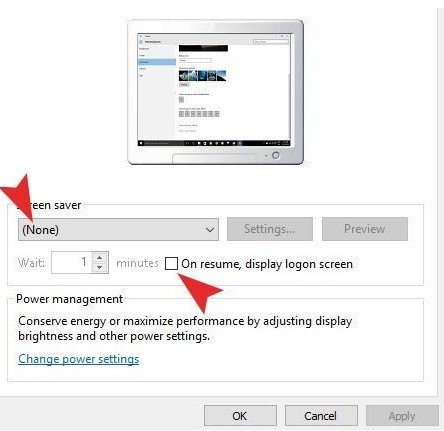
Step 3: Set the screen saver as NONE and Uncheck the box to On resume, display logon screen.

Part 3: How to Change Screen Saver Settings in Windows 10
First of all, open the Control Panel.
In the Control Panel window, click Appearance and Personalization.
Under Personalization click Change screen saver.
In the window that opens (shown below), under the Screen saver section, click the down arrow on the right side of the first box.
Once you have selected your screen saver (if you do not want to have a screen saver, select None) and adjusted any other settings to your liking, click Apply, then click OK.

That's all for how to open screen saver settings on Windows 10. If you have any question about your computer, like forgot login or admin password of your PC, then just get Windows Password Key to reset lost administrator and user passwords on any Windows 10/8.1/8/7/XP/Vista system without reformatting or reinstalling your system.
- Related Articles
- Top 5 Ways to Open Windows 10 Explorer
- Top 3 Free Ways to Fix Windows 10 Update Error
- Top 6 Options to Delete a User Account in Windows 10
comments powered by Disqus
