How to Add Password to Excel File
If you use your PC or MAC for work purposes, there are great chances to have a Microsoft Excel and Excel files that you wouldn't allow anyone else to open or read. Excel is an excellent tool used by consumers, business men, government institution and millions of other users around the world. Fortunately, you can encrypt your personal data in Excel file by adding a layer of password protection on it. It will prevent unwanted modifications and accidental deletion of the file. There are number of password protection types you can use, if you are trying to find, how to add password to Excel then keep on reading.
Part 1. How Many Kinds of Passwords in Excel?
There are number of password protection forms that can be used for security purposes on Excel files, these password protections types are listed below with step by step procedure on how to use them. These protection layers include:
- Password to Open: This won't allow you to open Excel file without knowing the password.
- Password to Modify: This won't allow you to do changes in Excel data without entering the password.
- Shared Workbook Password: This allows you to set password on Excel workbook that is shared on a network.
- Workbook Password: You can prevent unauthorized users to access or edit certain workbook.
- Worksheet Password: You can prevent unauthorized users to access or edit certain worksheet
- VBA Project Password: It allows you to lock your entire VBA project.
Part 2. How to Add Each Password to Excel?
This is how you can add password to Excel with each type in step by step procedure, follow the instructions carefully.
1. Add Password to Open:
You can add password to prevent unauthorized opening of file, password input will be prompted every time someone tries to access the Excel(2007) File, this is how you do it:
- Step 1: Open the Excel File you want to encrypt
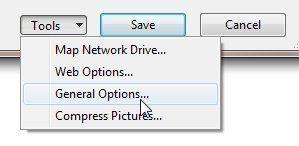
- Step 2: Open 'Save As" dialog box, a tool dropdown will appear near "Save As" button.
- Step 3: Open the dropdown and choose "General Options".
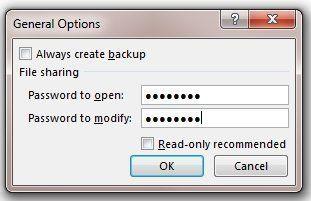
- Step 4: Enter desired password in "Password to open" textbox and click "OK".
2. Add Password to Modify(Excel 2007, 2010):
This protections will prevent modification from unauthorized by asking password every time someone tries to change data in the excel file. This is how to add a password to an Excel file and restrict modify permission:
- Step 1: Open the Excel File you want to encrypt.
- Step 2: Open ‘'Save As" dialog box, a tool dropdown will appear near "Save As" button.
- Step 3: Open the dropdown and choose "General Options".
- Step 4: Enter desired password in "Password to modify" textbox and click "OK"


3. Add Shared Workbook Password(Excel 2010, 2013):
This will allow you to set password on workbook file that has been shared over network to make sure only authorized person can access and modify the file, this is how you do it:
- Step 1: Open the Workbook you want to protect
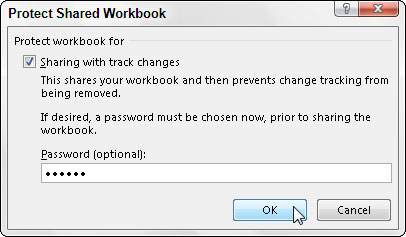
- Step 2: Now press "ALT +RO", it will open Protect Shared Workbook dialog box
- Step 3: Select "Sharing with Track Changes" check box to enable file sharing and turn on change tracking.
- Step 4: Now, "Password(optional)" textbox will be available, where you can enter password and then click "OK".
4. Add Workbook Password(Excel 2010, 2013):
This will allow you to set password encryption on your whole Excel Workbook, it is very simple to do:
- Step 1: Open the Excel File you want to protect
- Step 2: Open 'Save As" dialog box, a tool dropdown will appear near "Save As" button.
- Step 3: Open the dropdown and choose "General Options"
- Step 4: Enter desired password in single or both textboxes and click "OK".
- Step 5: Now "Save" the workbook.


5. Add Worksheet Password(Excel 2010, 2013):
This will allow you to set password on any specific worksheet you want ant prevent unauthorized modifications up to cell level, this is how you do it:
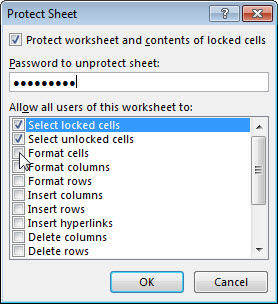
- Step 1: Click on "Review" tab and then select "Protect Sheet".
- Step 2: You can select checkboxes according to your security level in "All all users of this worksheet to" section.
- Step 3: Now, click "OK".

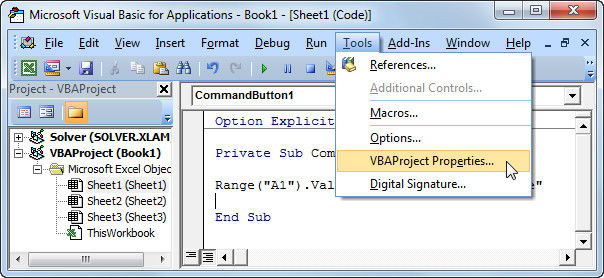
6. Add VBA Project Password(Excel 2007,2010, 2013):
In addition to add password to excel file you can also add password protection to VBA project very easily, this is how you do it:
- Step 1: Open and view the project in Excel you want to protect
- Step 2: Create a macro you want to protect
- Step 3: Now click "Tools" and then "VBAProject Properties".
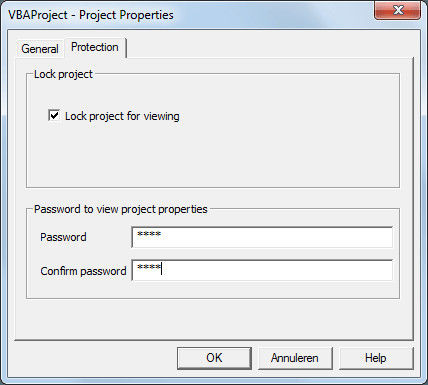
- Step 4: Go to "Protection" tab and check "Lock project for viewing" and enter password below.
- Step 5: Now, click "OK" and save the file.
Bonus Tips: How to Remove/Recover Lost Excel Password
If you are locked up on your Excel file and you know how to add a password to excel but now aware of removing it in case you forget, then worry no more there are several methods you can use to recover forgotten password. Below is one of the most effective and simplest method to get rid of password:
Option 1. Remove Excel Password with 7-ZIP
- Step 1: Download and install 7-Zip, Excel files are archive so we can use 7-Zip to edit parts of archive
- Step 2: Open the Excel file using 7-Zip, you can do that by right clicking the file and opening it with 7-Zip program
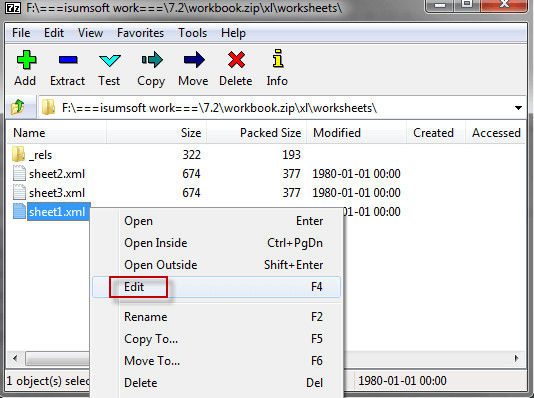
- Step 3: Now find "xl" folder and right click on "workbook.xml" and select "Edit"
- Step 4: Remove this tag completely:
- Step 5: 7-Zip will prompt to replace the existing XML file, select "Yes".
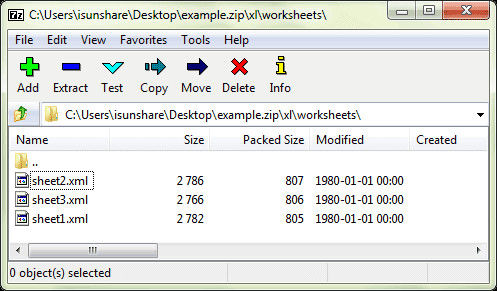
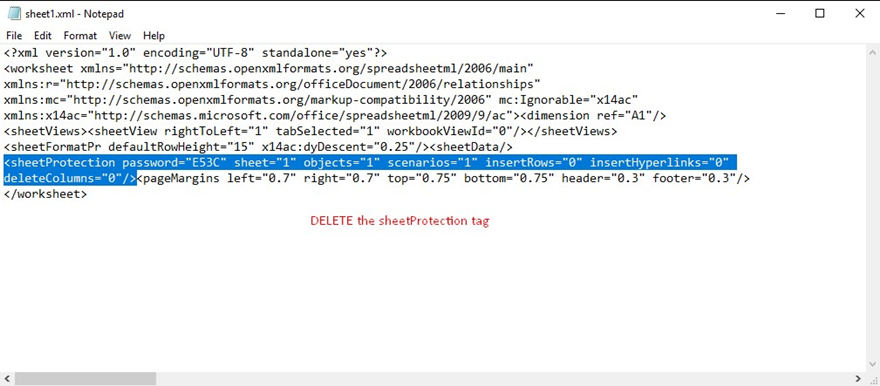
- Step 6: If you have password protection on worksheet then navigate to ‘'xl\worksheets\sheet1.xml" and remove the tag "<sheetProtection … >"
< workbookProtection workbookPassword="93AF" lockStructure="1" lockWindows="1"/>
Option 2. Recover Excel Password with PassFab Software
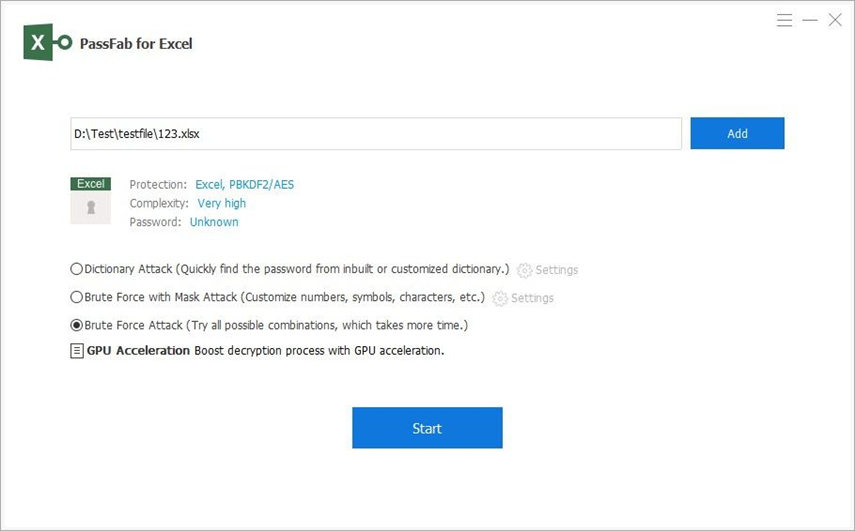
You can also use PassFab Excel Password Recovery program, this tool works for almost all versions of Microsoft Excel files. It can unlock your password very easily with brute force attacks. It works for both workbooks and spreadsheets, this is how to use the program to unlock your password protected excel files:
- Step 1: Download, install and open the program.
- Step 2: Launch the encrypted file by clicking "Add" button on main UI.
- Step 3: Select the appropriate recovery mode, you can select "Brute Force Attack", "Brute Force with Mask Attack" or "Dictionary Attack".
- Step 4: Click "Start", this will initiate brute force attack, it may take time according to password length and complexity


This guide covered how to set different kind of password protection to Excel files and prevent unauthorized access and modification and later on we also covered ow you can recover forgotten password to open your Excel files and an awesome tool which can break almost all kind of password protection and supports every version of Microsoft Excel.
Product-related questions? Speak directly to our Support Team >>
