How to Create A Password Protected Excel file
Creating a password for securing your Excel workbook would ensure that others can’t view the hidden worksheets, move, add, delete, or hide worksheets, as well as alter the structure of your workbook. So, it is essential that the Excel workbook has a password exclusively created for it. In Excel workbook, you get double layer security settings to make sure that Excel created password protects both the workbook and the current sheet within it.
With this article we will not only explain you how to create a password protected Excel file, but also unlock and recover passwords, when you lose or forget them accidentally.
Methods on How to Create a Password Protected Excel File
Undoubtedly password protection of your Excel workbook weighs higher in every aspect, be it your personal data or business/work related ones. To give you a helping hand in protecting your vital data, we have included how to create password protected Excel file for different versions of Excel.
Excel 2016
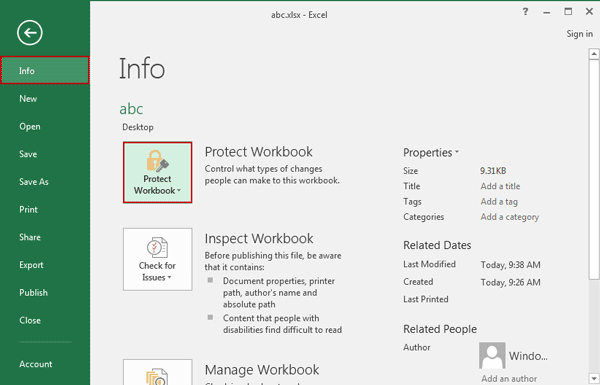
- Open the Excel file that you want to protect with a password and tap the ‘File’ option > ‘Info’ > click ‘Protect Workbook’ and then select ‘Encrypt with Password’. You can also achieve the same by tapping ‘Review’ tab > ‘Protect Workbook’.
- On the popup window you will be asked to enter the password. Key in a desired password and re-enter to confirm.
- Select if other protection options you want. Click ‘OK’ > ‘Save’. This is how you get to create password for Excel file.


Note: Memorize this password as losing it might be a real trouble, as you get locked away from the Excel file forever, unless you take help of third party tools. The ‘Info’ tab ensures whether an Excel worksheet has been locked or not.
Excel 2011
- Open the Excel workbook go to ‘Protection’ > tap the ‘Review’ tab > ‘Passwords’.
- On the popup window key in the password and click ‘OK’. Retype it to confirm and click ‘OK’.
- Now, hit ‘Save’. This will password protect your Excel file.


Excel 2010/2013
Open the Excel sheet ‘Review’ > ‘Restrict Editing’ > ‘Editing Restrictions’ > ‘Allow only this types of editing in the document’ > ‘No changes (Read only)’ > ‘Yes, Start Enforcing Protection’ > type a password in the popup and confirm.


Excel 2007
Excel 2007 being one of the most reliable versions is still loved by many users. Here is how to create password protected Excel file in Microsoft Office Excel 2007.
- Browse on your PC and then open the Excel file you want to password protect. Tap ‘Review’ tab > ‘Protect Workbook’. You can select ‘Protect Sheet’ here, in case you want to protect only a particular sheet of the document.
- Once you choose the ‘Protect Workbook’ > enter a password in the popup > ‘OK’ > re-enter password > ‘OK’.
- Define your desired settings and then click ‘Save’. The Excel file is locked now.

After learning how to create a password protected Excel file, how about learning how to create a read only Excel file now? Here is a sneak peek –
Excel 2003
Open the excel sheet > tap Microsoft Office button on top left > ‘Save’ (new file) / ‘Save As’ (for old file) > ‘Tools’ > ‘General Options’ > select ‘Read-only recommended’ checkbox > ‘OK’ > ‘Save’


Bonus Tip: How to Recover Lost Excel File Password
Once you are done with securing your Excel file by creating a password, you should know how to unlock/recover passwords as well. Who knows you might lose the password and get locked away from a potentially important Excel file forever. Worry not! PassFab for Excel would help you recover forgotten, lost, or unresponsive passwords from your Excel file and get it back to action. It doesn’t matter what version of Excel you are using and how did you created the password for Excel file, PassFab can recover and reset it within no time.
Here is the step-by-step guide.
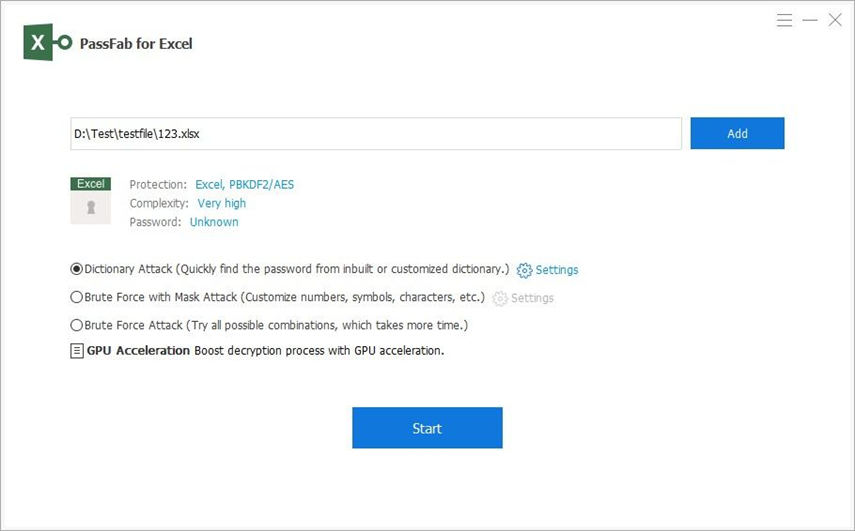
- Step 1: Ensure to install the PassFab for Excel on your computer and then open the locked/password forgotten file by tapping the ‘Add’ button. As soon as the file gets imported move to the next section.
-
Step 2: Here, you have to decide the most suitable option under ‘Select a Password Attack Type’ section. Key in all the details under ‘Settings’ tab against whatever option you have selected.

Note:
- Brute-force attack (default password recovery option) – verifies all characters one by one and searches the password.
- Dictionary Attack – when you have an existing password dictionary thats provide you the password.
- Brute-force with Mask attack – verifies the customize symbols, characters, and numbers to retrieve the password, when part of the password is known to you.
- Step 3: Tap ‘Start’ right after filling in the settings and options. Now the password has been recovered, and you can easily use the Excel file.


Conclusion
You have learnt how to create password protected Excel file through this article as well as how to recover lost/forgotten passwords and unlock the file in this section. From the above information it becomes clear that PassFab is an unmatched tool for resetting, recovering, and unlocking Excel sheets, without any restrictions. The traditional methods always come with some limitations, but this software ensures that your data doesn’t get lost or becomes irrecoverable, just because you couldn’t recall the password. Password protecting saves our data, but it can prove serious when you are locked away from it. So, for managing your Excel workbooks at their best, you would obviously need PassFab to have your back.
Product-related questions? Speak directly to our Support Team >>

