Enable the Built-in Administrator Account in Windows 7

How to Enable or Disable the Built-in Administrator Account in Windows 7

2014-03-04 11:26:35 / Posted by Michael Eric to Windows Tips
Follow @MichaelEric

"How do I enable the built-in administrator account in Windows 7, so that I don't constantly have to select "Run as Administrator" on programs I run frequently?"

What is the Built-in Administrator Account in Windows 7?

Including built-in administrator user account, Windows 7 has three different kinds of user account: Standard user and administrator user account. First, get to know the definition and rights of them respectively.

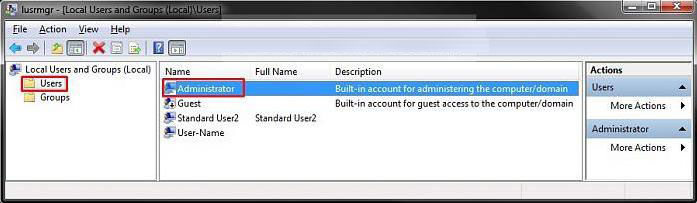
Built-in administrator user is created during the installation of Windows 7 or setup already for you on an OEM (ex: Dell) computer. By default, the built-in administrator account is named Administrator, and is disabled. Log as that account you will have complete access to the computer and can make any desired changes and will not be prompted by UAC.

Standard account can help protect your computer by preventing users from making changes that affect everyone who uses the computer. Creating a standard account in Windows, you can do almost anything that you can do with an administrator account. But if you want to do something that requires elevated rights that affects other users of the computer, such as installing software or changing security settings, you need to have the administrative privilege.

Administrator user is an unelevated administrator account that is created by default during the installation of Windows 7. An administrator account has complete access to the computer, and can make any desired changes. To help make the computer more secure, this administrator account type will be prompted by UAC by default to give confirmation before allowed to make any changes that require elevated administrator rights.

Tips: For your Windows 7 computer's safety, you may choose a login password to protect it. Thus, if you forgot Windows 7 administrator password or other user account password, you can apply for Windows Password Recovery to crack the forgotten one in only a few clicks.

This will show you how to activate built-in default administrator in Windows 7 in three different yet easy-to-perform options.

How to Enable (or Disable) Default Administrator in Windows 7?

Option 1: Enable Built-in Administrator Account in Local Users and Groups

  • 1. Open the Local Users and Groups manager.
  • 2. In the left pane, click on the Users folder.

    how to enable the built-in administrator account in windows 7

  • 3. In the middle pane, right click on Administrator and click on Properties.
  • 4. Uncheck the Account is disabled box to enable the built-in elevated administrator account.

    enable the built-in administrator account in windows 7

  • 5. Click on "OK".

    Note: To disable built-in elevated administrator account in Windows 7, check the Account is disabled box in Step 4.
  • 6. Close the Local Users and Group window.
  • 7. Log off, and you will now see the built-in administrator account log on icon enabled from the log on screen.

Option 2: Activate Built-in Administrator Account in Local Security Policy

  • 1. Open the Local Security Policy editor.
  • 2. In the left pane, expand Local Policies and click on Security Options.

    how to activate built-in administrator account in windows 7

  • 3. In the right pane, right click on Accounts: Administrator account status and click on Properties.
  • 4. Enable hidden built-in administrator account in Windows 7 by selecting Enabled.

    activate built-in administrator account in windows 7

    Note: To disactivate built-in hidden administrator account in Windows 7, select Disable in Step 4.
  • 5. Click on OK.
  • 6. Close the Local Security Policy window.
  • 7. Log off, and you will now see the built-in administrator account log on icon enabled from the log on screen.

Option 3: Enable Built-in Default Administrator Account in an Elevated Command Prompt

  • 1. Start System and press "F8" to enter Safe Mode with Command Prompt.
  • 2. Choose any administrator account and you will enter the elevated command prompt, type net user administrator/active: yes and press Enter.

    how to enable built-in hidden administrator account in windows 7

    Note: To disable your built-in hidden administrator account in Windows 7, type net user administrator/active: no and press Enter here.
  • 3. Close the elevated command prompt.
  • 4. Log off, and you will now see the built-in administrator account log on icon enabled from the log on screen.

All the options to activate built-in elevated administrator account in Windows 7 are introduced. Choose the much more suitable one for you.

Download SmartKey Windows Password Recovery Standard:

Free Trial Buy Now

Only $19.95

Secure Download
30 Days Money Back Guarantee
comments powered by Disqus

Copyright©2007-2020 SmartKey Password Recovery. All rights Reserved.