Top 3 Ways to Enable or Disable Built-in Administrator Account in Windows 10

How to Enable or Disable Built-in Administrator Account in Windows 10

Dec. 09, 2014 11:12 am / Posted by Michael Eric to Windows Tips
Follow @MichaelEric

For Windows 10 administrator account, you can set an unelevated administrator user or an elevated built-in administrator. Different from unelevated administrator account, the hidden built-in elevated administrator account is a local account that has full unrestricted access rights to the PC. Anything that runs while signed in to this "Administrator" account will also have full unrestricted access to the PC, so it is not recommended to use the built-in "Administrator" account for everyday usage. It's recommended to only use the built-in "Administrator" account as needed instead.

But as to how to enable or disable built-in administrator account in Windows 10, this article will give a overall guide. Just read the following part to learn the 3 handy way to achieve your goal.

Way 1: Enable/Disable Built-in Administrator Account in Elevated Command Prompt

  • Step 1: Open an elevated command prompt.
  • Step 2: To enable the account. In the elevated command prompt, copy and paste the command below, press Enter.

    net user administrator /active:yes

    how to disable built-in administrator account in windows 10

    To Disable the account. Copy and paste the command as below, then press Enter.

    net user administrator /active:no

    how to enable built-in administrator account in windows 10
  • Step 3: After finished, just close the elevated command prompt.

Way 2: Enable/Disable Built-in Administrator Account in Local Users and Groups

  • Step 1: Press the Windows + R keys to open the Run dialog, type lusrmg.msc, click or tap on OK.
  • Step 2: In the Users and Groups window, tap on the left pane, then tap on the User folder. In the middle pane, double click or tap on Administrator.

    how to disable built-in administrator account in windows 10
  • Step 3: To enable the account, uncheck the “Account is disabled” box, click or tap on OK.

    To disable the account, check the “Account is disabled” box, click or tap on OK.

    how to disable built-in administrator account in windows 10
  • Step 4: After choosing, you can close the window as you like.

Way 3: Enable/Disable Built-in Administrator Account in Local Security Policy

  • Step 1: Press the Windows + R combination to open the Run dialog, type secpol.msc, and click or tap on OK.
  • Step 2: In the Local Security Policy window, open Local Policies folder, click or tap on the Security Options folder.

    how to enable built-in administrator account in windows 10
  • Step 3: Seeing the picture above, in the right pane of Security Options, double click/tap on Accounts: Administrator account status.
  • Step 4: To enable the account, select Enabled, then click or tap on OK.

    To disable the account, select Disabled, click or tap on OK.

    how to disable built-in administrator account in windows 10
  • Step 5: Here you can close the window.

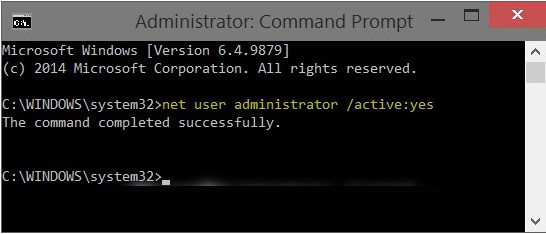
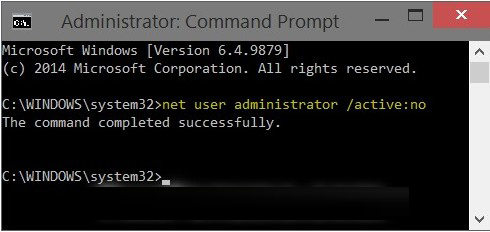
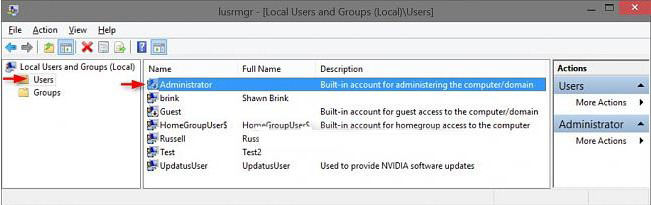
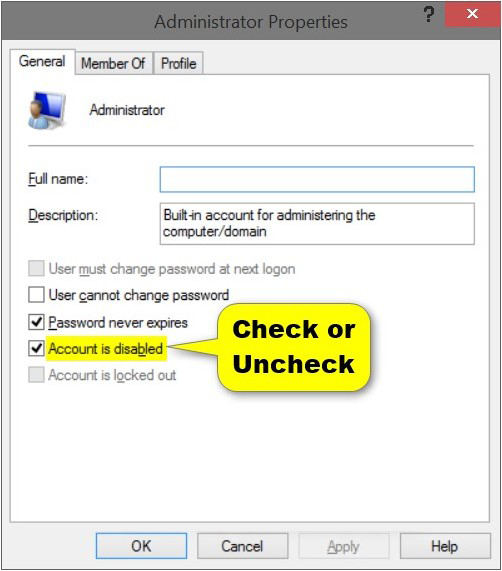
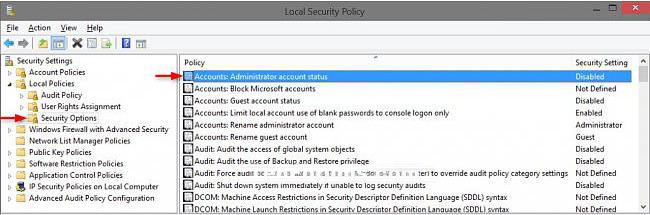
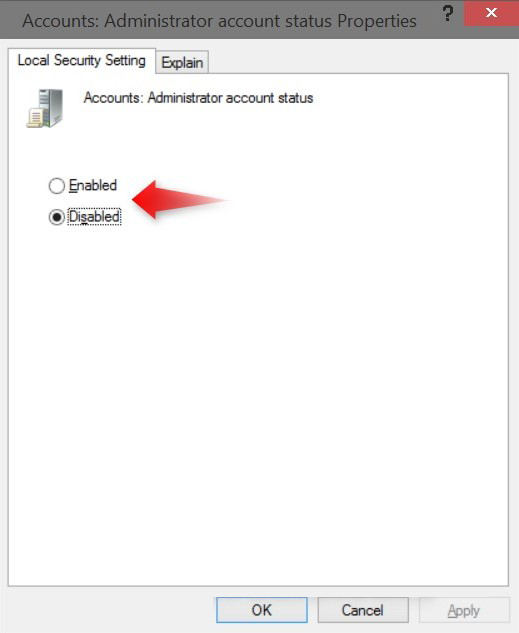
Choosing from the 3 ways to enable or disable your Windows 10 built-in elevated administrator account. Try to remember your Windows 10 login administrator password firmly. If you forgot it and got locked out of your PC, just turn to Windows 10 password recovery for help.

Download SmartKey Windows Password Recovery Standard:

Free Trial Buy Now

Only $19.95

Secure Download
30 Days Money Back Guarantee
comments powered by Disqus

Copyright©2007-2020 SmartKey Password Recovery. All rights Reserved.