Modern Dell computers are equipped with a built-in hidden recovery partition on the hard drive. The partition contains recovery software used to perform maintenance tasks on the PC and it stores the information required to restore your computer's factory settings in the event of a problem with your machine or create a recovery disc set.
What Accessing A Hidden Dell Partition Is?
Dell computers have a recovery partition that you can access to recover and restore your computer. Performing Dell recovery partition means to return the computer to its original condition. It will remove all software as well as files saved to the hard drive, reinstall the original operating system, and then runs an initial setup to install the default programs. According to the different modes of Dell computers, Dell has 2 programs for backup and restore:
Dell Inspiron, Dell Studio and Dell XPS models are using the Dell DataSafe Local Backup 2.0 software
Dell OptiPlex, Dell Latitude, Dell Vostro and Dell Precisions models are using the Dell Backup and Recovery Manager software
Windows XP and Windows Vista users may have their Dell backup and recovery software called Dell PC Restore (by Symantec)
How to Access Dell Recovery Partition in Windows 10/8.1/8
Backup your files before restoring partition on Dell Windows 8.
Step 1: Remove any peripherals, except your keyboard and mouse: scanners, printers, USB drives, smart phones or tablets etc. If you have a laptop, remove it from the dock station and make sure it runs with AC adapter plugged in.
Step 2: Do not restart your computer yet.
Step 3: While you are logged into Windows 8, hold the "Shift" key and restart your computer (restart the computer while holding the "Shift" key).
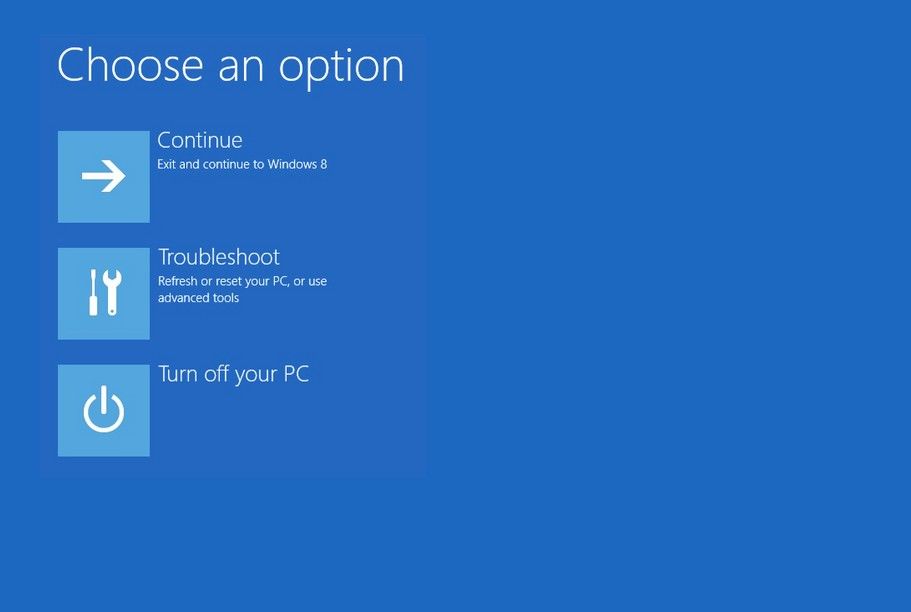
Step 4: Your computer should now restart into the recovery options menu. Choose "Troubleshoot" when the screen is titled "Choose an option".
Step 5: Select "Dell Backup and Recovery" item from the list – this is usually the last item in the list.
Step 6: Your computer may restart again.
Step 7: Click Next when the "Dell Backup and Recovery" screen appears
Step 8: Windows 8 Smart Repair feature will load and check if any errors can be fixed automatically. When this process is done, click "Next".
Step 9: Choose the "Factory Image" option, click "Next".
Step 10: You'll be asked to backup your files. If you have a USB flash drive to backup your data, select "Yes, backup my personal files". If you are OK with delete all data from your computer, you can select "No, Erase my files".
Step 11: The process will now start. When this is finished, select "Restart to restart your computer".
Step 12: Follow the wizard instructions to setup Windows 8 again.
How to Access Dell Recovery Partition in Windows 7
Backup your files before restoring partition on Dell Windows 7.
Step 1: Remove any plugged peripherals, except your keyboard and mouse. Peripherals include your scanner, printer, USB drives, smartphone, tablet etc.
If you use a laptop and it's docked: remove the laptop from the dock station. It should not run on battery, but with AC adapter plugged in.
Step 2: Boot your computer.
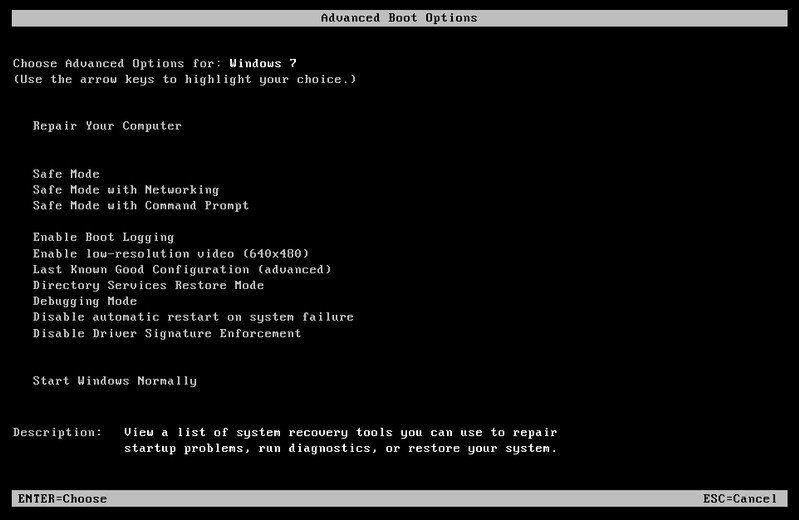
Step 3: When the Dell logo appears on your screen, press the F8 key several times to boot into the "Advanced Boot Options" menu of the Windows 7 system.
Step 4: Select "Repair Your Computer" from the list. Use the arrow keys to go up and down through the list.
Step 5: The "System Recovery Options" screen will appear, select your keyboard and click Next.
Step 6: Log in as "Administrator". If you don't have this account, use any user account that has administrative rights to Windows 7.
Step 7: Select "Dell Factory Tools" (this is usually the last item in the list). The name can also be "Dell Backup and Recovery Manager".
Step 8: Click Next to confirm the action
Step 9: Check the Yes, reformat hard drive and restore system software to factory condition checkbox.
Step 10: The restore process will now start. The process can take up to 10 minutes.
Step 11: When the process is finished, click Next to restart your computer.
How to Access Dell Recovery Partition in Windows XP
Backup your files before restoring partition on Dell XP.
Step 1: Boot your computer
Step 2: When the Dell logo appears on your screen, hold the "Ctrl" key and press "F11" simultaneously
Step 3: The "Dell PC Restore by Symantec" screen should now appear
Step 4: Select "Restore" and follow the instructions of the wizard. Use the "Tab" key to highlight "Restore" and make the selection
Step 5: When the "all data will be lost" warning message appears, click Confirm (or use the "Tab" key to select Confirm)
Step 6: Press "Enter"
Step 7: The progress screen will appear and the restore process starts. This process can take up to 10 minutes
Step 8: A success message will appear when the process is finished: The system recovery process was successful.
Step 9: Click Finish (or use the "Tab" key to select Finish)
Step 10: Press "Enter"
As all you can see, to boot into the partition on Dell PC recovery is not difficult at all. Acquire the information and then you'll restore Dell recovery partition easily. You can refer here to know more information about Windows Tips.
Download SmartKey Windows Password Recovery Standard:


 Follow us on Twitter